pictkura Manual
Import your photos, lay them out, find them, look at them. That is all this app does.
1. Getting started — register a library
On first launch your Pictures folder, if there is one, is added automatically (the ✕ beside it removes it; no photos are deleted). For other folders, or if nothing was added, use “Add a folder” at the bottom of the left pane: choose a folder with “Browse…”, or type its full path and press “Add” (the box shows an example). Clicking a drive under “Drives” on the left does not add it; it opens an import from that drive.
On Windows, Pictures is often on OneDrive: online-only photos download as you scroll to them (8. Files that only exist in the cloud).
Scanning starts immediately, and a grid ordered by date builds up. The grid stays live while the scan runs — rows appear as they are ready. While a scan is running (a folder added or removed, Rescan, the import destination, a drive coming back) or new photos that have no thumbnail yet are still being read, the header shows “Updating” or “n left” next to the count (hover over it for the full text). Work that ends quickly and the sync at startup are not shown, nor is anything while the import screen is open.
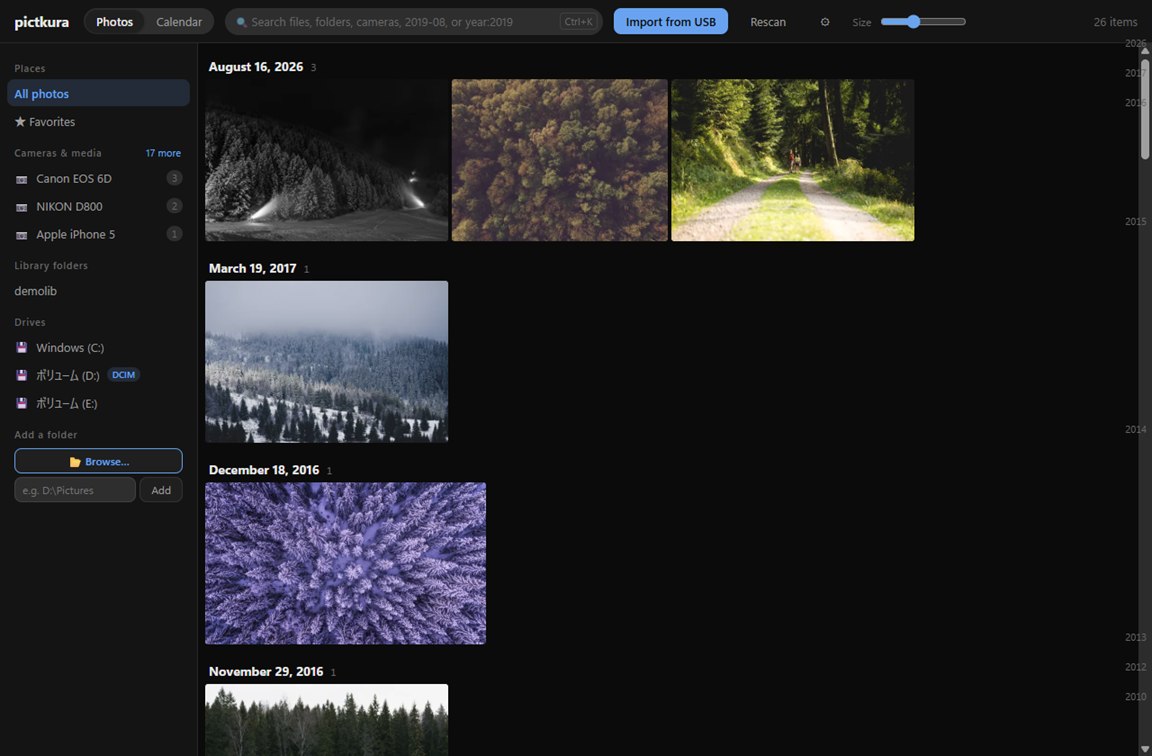
The second launch is much faster. pictkura reads the change journal the Windows file system already keeps (the USN journal) and only looks at the files that changed since last time. Folders on a USB drive or SD card (FAT32 or exFAT) are the exception: they are walked in full on every launch, and while the library has one, the journal is not used and the other folders are checked folder by folder.
2. Import from a USB drive or SD card
Press “Import from USB” at the top.
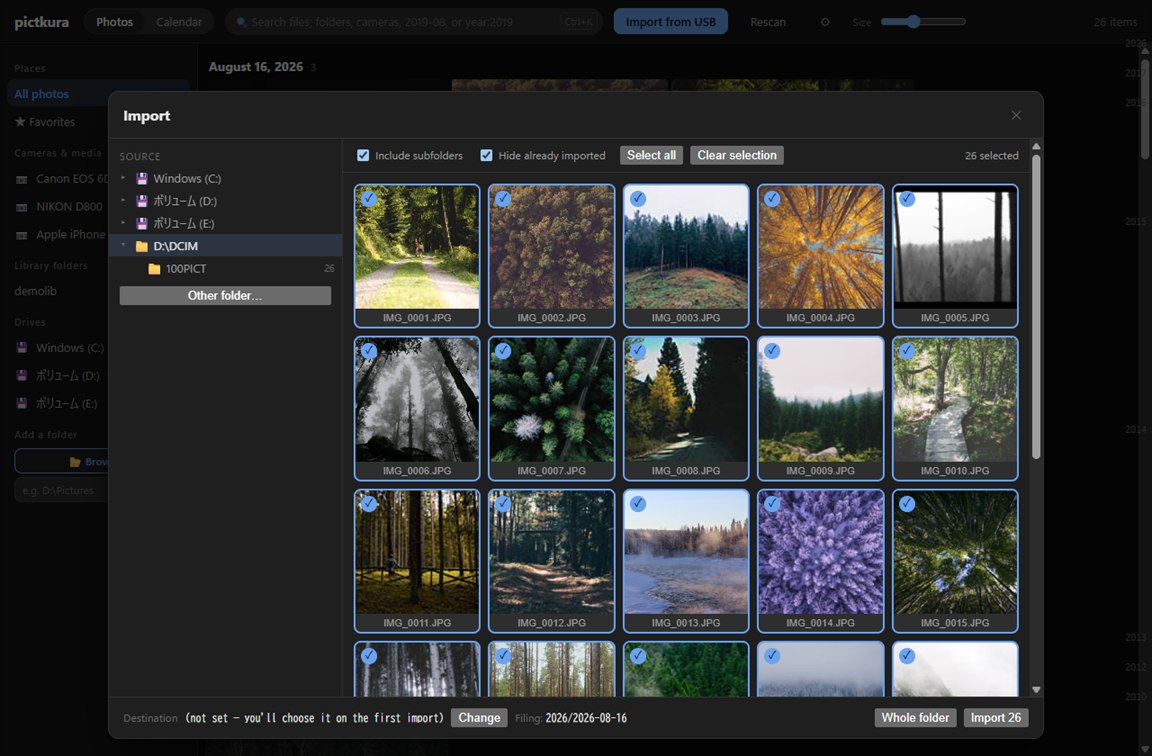
| Control | What it does |
|---|---|
| Include subfolders | Picks everything up even when the card has date folders under DCIM. Choosing a folder scans all the way down by default |
| Hide already imported | Hides what is already in your library. The check runs through the same code as the import itself, so the “done” badges never disagree with reality |
| Destination | Set any folder from “Change” at the bottom. If it is unset, you are asked when the import starts |
| Whole folder | Imports the selected folder in its entirety |
While copying you get a progress bar, an estimated time remaining, and the photo currently being copied, and the view moves to the progress when the import starts. When a copy finishes, sizes are compared to verify it.
When exactly one camera card (a removable drive with DCIM) is inserted, the import opens with it already selected. On Windows the same goes for a single removable drive when there is no card. Cards and removable drives stand out in the list on the left.
An import that arrives from AutoPlay while Settings is open waits until Settings closes. Settings says “An import is waiting”; press “Close and import” to open it.
Offer pictkura when a card is inserted (Windows only)
When you insert a USB drive or an SD card, “pictkura で写真を取り込む” (import photos with pictkura) appears among the Windows AutoPlay choices. It never starts on its own: the import wizard opens on that drive only when you choose it. The entry itself is worded in Japanese, except with the English MSI, where it reads “Import photos with pictkura”.
The entry is registered by the installer (MSI or setup) and by the Microsoft Store version, and uninstalling removes it. The app itself registers no entry (it removes the one an older version registered from the app; if pictkura was your AutoPlay default, the installer versions move that choice to the new entry, and the portable build clears it). The portable build does not offer it. Change what happens by default with “Open Windows AutoPlay settings” under “When you insert a USB drive or SD card” in Settings ⚙ (see also “When inserting a card asks you nothing” below).
Versions up to 0.3 registered the entry from the app at startup. Installing a new version clears that old entry
(right after the installer runs; on a shared PC, for each other person when they first start the new version).
If you had the entry with the portable build, start the new version once, or run
pictkura.exe --unregister-autoplay when you stop using it.
When moving from the installer version to the Microsoft Store version, uninstall the installer version first —
the Store version cannot remove the old entry, so two entries with the same name would appear.
When inserting a card asks you nothing
If your Windows account already has a default action, inserting a card shows no choices at all. Windows performs whatever was decided (for example “Open folder to view files”) without asking. pictkura is registered as a choice, but nothing ever puts the question to you.
Check and change it under Settings → Bluetooth & devices → AutoPlay. “Choose AutoPlay defaults” lists “Removable drive” and “Memory card”. Pick “Ask me every time” if you want to choose on every insert, or pictkura’s own entry if you always want pictkura. That entry reads 「pictkura で写真を取り込む」 — it is worded in Japanese whatever your Windows language is (with the English MSI it reads “Import photos with pictkura”), so look for the pictkura icon and the name in brackets. If that list shows it at all, the registration is working.
If you would rather see the choices once without changing the default, right-click the drive in File Explorer and choose “Open AutoPlay”: the picker that should have appeared on insert opens on the spot. In the Windows 11 right-click menu it lives under “Show more options” (or Shift+F10).
Files that sit next to a photo travel with it
A .xmp written by a raw developer (develop settings, ratings, keywords) sits
next to the photo under the same name. pictkura carries those along:
leaving one behind looks, later on, exactly like losing all your edits.
This applies when importing, when copying or moving to a folder, and when
sending a photo to the recycle bin.
| Extension | Written by |
|---|---|
.xmp | Adobe (Camera Raw / Lightroom / Bridge), darktable, digiKam, Photo Mechanic |
.aae | Photos on iPhone / iPad |
.dop | DxO PhotoLab |
.pp3 | RawTherapee |
.on1 | ON1 Photo RAW |
Anything else — video thumbnails (.thm), low-resolution proxies
(.lrv), PlayMemories Home bookkeeping (.modd,
.moff), voice memos (.wav) — is
not carried by default, because the camera can regenerate it or it belongs
to another application. You can add what you need to the settings file (see “Where settings and
data live”), or empty the list to carry nothing at all.
Write it under [import] in pictkura.toml.
When the line is absent the five defaults apply, so add it only if you want
something different.
[import]
# also carry voice memos (.wav)
sidecar_extensions = ["xmp", "aae", "dop", "pp3", "on1", "wav"]

# carry nothing
# sidecar_extensions = []
If you shoot RAW+JPEG (IMG_0001.CR3 and
IMG_0001.JPG), the pair lands in the same date folder even when only
one of the two carries a capture time (the other follows it). Without this the pair
would be split across folders and could no longer be matched up. If neither file carries a
capture time, each falls back to its own modification time.
When you send only one half of the pair to the trash, a sidecar that is tied
to the photo by name alone (IMG_0001.xmp) stays
behind: with a same-named photo still there, which one it belongs to cannot be
decided (Lightroom writes .xmp for raw files only). A sidecar that carries the
full file name (IMG_0001.CR3.xmp) belongs to that one photo, so it moves with it.
3. Decide how imported photos are filed
⚙ (Settings) → “Import folder structure”. Where photos end up is hard to change later, so it is worth deciding first. There are nine common layouts to choose from.
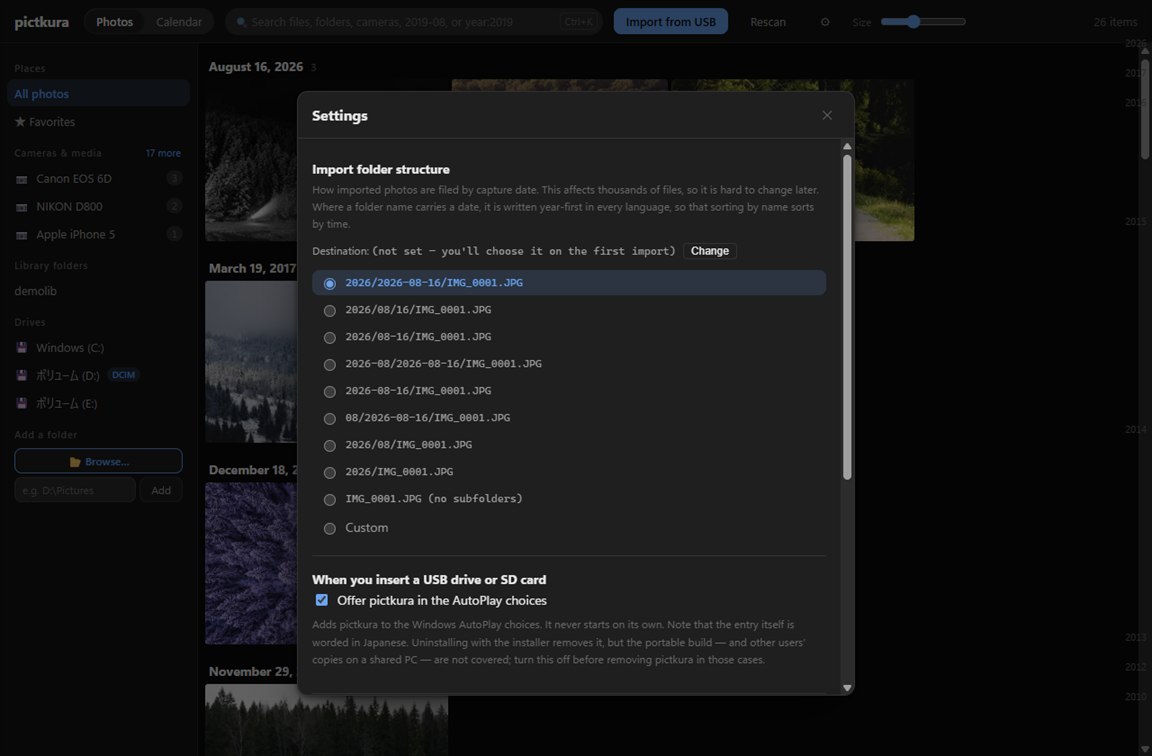
| What you can write | What it becomes |
|---|---|
{year} | four-digit year (2026) |
{month} | two-digit month (08) |
{day} | two-digit day (13) |
/ | a folder level |
As you type, the folder name you will actually get is shown right there.
Any text outside the braces is kept as you wrote it: photos-{year}/{month}-{day},
for instance, gives photos-2026/08-13/.
If you keep the year folders yourself, point the destination at that year’s
folder and choose 2026-08-16/ (no year level) or 08/2026-08-16/.
Only date folders are then added underneath.
Folder names are built year-first in every language.
That is so sorting by name sorts by time, which is the usual convention for photo
tools (Immich defaults to Year/Year-Month-Day, and every dated folder
format Lightroom Classic offers starts with the year). Dates shown on screen follow
your language; dates in folder names follow the sort order.
.. (move to the parent folder), absolute paths, and characters that are not
allowed in file names are dropped automatically. Whatever you write,
nothing is ever written outside the destination.
Where the date comes from
The date that picks the destination folder during an import comes from EXIF (the container, for videos), then from the file name, then from the other half of a RAW+JPG pair, then from the file’s modification time — and if even that is unusable, from the day of the import itself. It never asks the OS or your library: at import time there is no library entry for the file yet.
The list below is how the date is decided once the photo is in your library, for the grid and the viewer. The first of these that exists is used.
- EXIF capture time — written by the camera or phone
- What the OS already knows — available even when the file only exists in the cloud
- A date in the file name — used when the name carries one, as in
2024-01-01 12.34.56.jpg - File modification time — when none of the above exist
Screenshots and images saved from social apps usually carry no EXIF, and modification time alone files them under “the day you saved it”. When the name carries a date, that wins, so they land on the right day.
When pictkura can make no picture for a file — a RAW with no usable preview, say — a capture time read on an earlier pass comes third, after EXIF and the OS, ahead of the file name. A date that was only the modification time, used because nothing else could be read, does not count. A file whose image size cannot be read is checked again on every startup, and this keeps a pass that reads nothing from erasing a capture time read before.
4. Find
Use the search box at the top, or the command palette with Ctrl + K (⌘ + K on macOS).
| What you type | What it means |
|---|---|
okinawa | Substring match on file name, folder name and camera name. Languages that are not written with spaces match in the middle too, so 「旅行」 finds 「沖縄旅行」 |
camera:α7 | Narrow by camera (the same as “Cameras & media” in the left pane) |
folder:trip | Narrow by folder name |
2019-08 2019/8 2019-08-11 | Narrow by capture date. Just typing digits, such as 2019, is treated as text, not a date — it cannot be told apart from a file name |
year:2019 | Narrow to a single year |
★ | Favorites only |
⚑ pick: | Picked photos only (a separate shelf from ★) |
kind:raw type:video | Filter by kind (the same as “Kind” in the left pane): photo, raw, video |
All terms are ANDed. The order is fixed: newest capture date first.
Besides jumping to a date, narrowing by camera and searching, the command palette offers actions (“Import from USB”, “Rescan”, “Show favorites only”, “Show picked only”, “Show keyboard shortcuts”, “Show all photos”, “Calendar view”, “Photo grid”). When what you type matches the start of an action’s name (the start of a word), that action is listed above the search. Actions also answer to their English names whatever language the app is in.
When a filter leaves no photos at all, the heading names the filters in effect (“No photos match these filters: …”). “Clear search” clears the search, and “Show all photos” clears every filter at once. If photos are still being imported or indexed, it says more may turn up. If the sync that runs at startup did not finish, it asks you to press Rescan.
5. Look
Click a tile to open the full-size viewer.
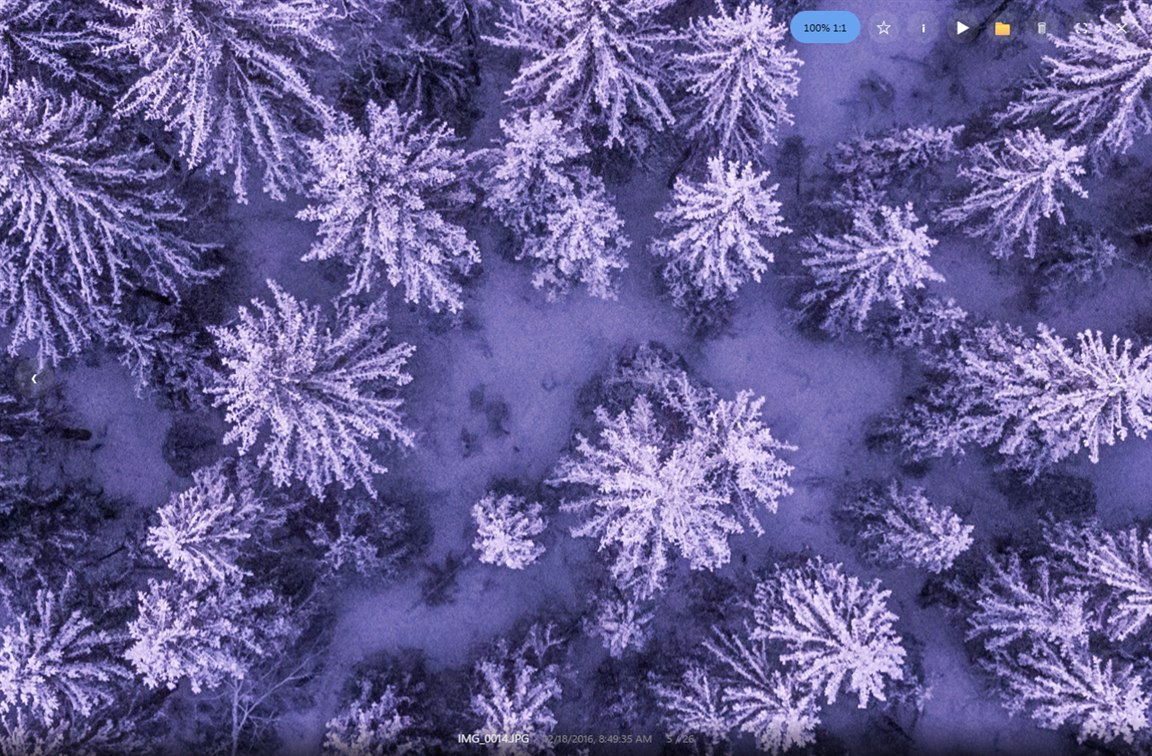
| Key | What it does |
|---|---|
| ← → | Previous / next photo (same for videos) |
| P / U | Pick (flag it ⚑) / undo the judgement on this photo (clear ⚑ and ✕). By default this moves on to the next photo; Settings → “When you view a photo full screen” turns that off |
| X | Reject it (✕). Nothing is deleted when you press it — rejected photos go to the trash together when you close the viewer |
| Ctrl + C | Copy the picture on screen to the clipboard (⌘ + C on macOS). See “Take out the picture you are looking at” below |
| Ctrl + S | Save the picture on screen to a file (⌘ + S on macOS) |
| Ctrl + P | Print the photo on screen (⌘ + P on macOS) |
| Space | Start or stop the slideshow. On a video, play / pause |
| F | Toggle favorite (★) |
| I | File details (name, folder, size, date taken, date modified, dimensions, type, and length for a video) and capture details (camera, lens, focal length, aperture, shutter, ISO, GPS) |
| 1 / 0 | 1 toggles between actual size 100% and fit to screen; 0 always fits |
| F11 | Full screen |
| Esc | Close |
| ? / F1 | Show the keyboard shortcuts (works in the grid too) |
| Ctrl + , | Open Settings (works in the grid too; ⌘ + , on macOS, or pictkura → Settings… in the menu). The same panel the toolbar gear opens — and the way in if the toolbar is ever too narrow to show the gear |
Right-click for “Open”, “Open with another app…”, “Show in folder”, “Show more options” (Windows), “Copy image to clipboard”, “Rotate right”, “Rotate left”, “Print…”, “Add to favorites”, “Pick”, “Info” and “Delete (move to trash)”. “Info” shows the name, folder, size, date taken and more (both files of a RAW+JPEG pair). When you select photos in the grid, a line under the selection bar shows the name and size, or the total for several. With Outgoing on, “Add to Outgoing” is there too; while Outgoing on the left is shown, “Remove from Outgoing” takes its place (9. Outgoing). An editing app you pick once is remembered and appears in the menu from then on.
Right-click a JPEG in the grid or the viewer and choose “Rotate right” or “Rotate left” to turn it. Only the orientation information in the file (EXIF) is rewritten, so the image quality does not change. Other apps show the photo turned too. Rotating gives the file a new modification time. A photo you rotated in pictkura gets “Restore original orientation”, which puts back the orientation and the modification time it had before. Turning a photo back to where it started also puts the original modification time back. In a RAW+JPEG pair only the JPEG turns. Photos on a camera card and photos that are only in the cloud can’t be rotated, and neither can a JPEG with no orientation information, such as a screenshot. When a photo can’t be rotated for another reason, a message says why. Importing a card again after you rotated one of its photos does not bring that photo in twice.
Choose “Print…” from the right-click menu to print that photo on a page of its own. Pick how it goes on the paper: “Fit to page”, “Crop to fill” or “Stretch to fill (ignore proportions)”, then go on to the system print dialog. pictkura remembers your choice. When the photo and the paper face different ways, the photo is turned to match. The image sent to the printer has its shooting details, such as the location, removed, so saving to PDF does not carry the location along. For a borderless print, choose a borderless paper size in the print dialog.
To print several photos, select them and choose “Print…” in the selection bar. You can put 1, 2, 4, 6 or 9 photos on a page, and add each file’s name and date taken underneath (an index print). The same three ways of placing a photo apply, and photos that do not fit continue on the next page. They are printed in grid order (newest first) and are not turned. Videos are not printed. For a RAW+JPEG pair, the side chosen for viewing photos large is printed. There is a limit to how many photos can be printed at once (28 at one per page, up to 130 at nine per page).
On Windows, “Show more options” opens the same menu as File Explorer, with “Send to”, “Open with”, “Properties” and the rest. If you move a photo elsewhere from that menu, its favorite and pick marks are dropped.
Opening a photo by clicking its tile grows it out of the tile. Closing shrinks the current photo back into its tile (scrolling the grid there if the tile is off screen). There is no motion when you open from the calendar, for videos, or when the transition is set to None.
When you step to the previous or next photo, it slides in from the side you stepped toward. Holding a key down to step does not animate. Settings → “When you view a photo full screen” switches this to None or Fade. The slideshow transition is chosen separately and fades by default. If your system is set to reduce motion, photos change without moving whatever you choose.
Deleting always goes through the Recycle Bin. The app never removes a file outright. The one exception is the Outgoing folder: when a photo is moved to the Recycle Bin in pictkura, and when you use “Remove from Outgoing”, what was placed in the Outgoing folder is taken out without going through the Recycle Bin (the photo itself stays where it was or in the Recycle Bin, and an embedded JPEG can be taken from its RAW again; see 9. Outgoing).
Take out the picture you are looking at
📋 at the top right copies it to the clipboard, 💾 saves it to a file; the keys are Ctrl + C and Ctrl + S (⌘ on macOS). What comes out is the picture that is on screen, exactly as you see it.
From a RAW you get the display JPEG the camera embedded, as it is. Nothing is developed — that embedded picture is also what the viewer shows you. For a photo the app can display directly (JPEG, PNG and so on) the original file is copied: nothing is re-encoded, so the shooting information (Exif) and the colour profile (ICC) survive.
Saving starts in the folder you saved to last time (your Pictures folder the first time).
What comes out of a RAW can be smaller than the original. How large the embedded display JPEG is depends on the camera; older bodies store as little as 160×120 to 640×480. With no development, that is the ceiling for that file. For the same reason, a picture taken out of a RAW may carry no shooting information — whether the camera put Exif into the picture it embedded is up to the camera.
For a RAW with no display picture inside, the buttons are not shown at all.
This depends on the camera, not on the format. 151 of 1,870 real files
fell here — mostly phones writing dng (HUAWEI, Samsung, LG, Xiaomi),
Blackmagic CinemaDNG, Canon before CR2 (crw) and Panasonic before RW2
(raw). The viewer shows no picture for these, only the line “This file cannot be
displayed (the file is damaged, or pictkura cannot read this format)” — there is no
picture anywhere in the file to take out. You can look up your own body in the
camera list.
SVG can only be saved, not copied to the clipboard or printed.
6. Select several at once
Hover a tile and click the circle in its corner, or Ctrl + click it (⌘ on macOS), to start selecting. A bar appears at the top of the window with what you can do to the selection.
| Action | What it does |
|---|---|
| The circle, or Ctrl + click | Add or remove one photo |
| Shift + click | Select everything between the tile you clicked last and this one. Days you have not scrolled to yet are included |
| Click a date heading | Select that whole day. Click it again to unselect it |
| Ctrl + A | Select everything the current search and ★ / ⚑ filter match |
| Esc | Stop selecting |
While something is selected, a plain click toggles a tile instead of opening the viewer. From the bar you can add or remove ★ or ⚑ for the whole selection, copy or move it to a folder you pick, print it, or move all of it to the Recycle Bin in one go. It asks before deleting. Deleting, moving and copying run one at a time; pressing again while one is running tells you to wait for it to finish. With Outgoing on, the bar also has “Add to Outgoing” (“Remove from Outgoing” while Outgoing on the left is shown).
⚑ Picked
The ⚑ that P puts on a photo is a separate shelf from ★ favorites.
★ is “a photo I want to come back to”; ⚑ is “the one frame I keep out of this burst”.
Sharing one mark would fill your favorites with the leftovers of every culling session.
“⚑ Picked” in the sidebar lists what you picked, the search box takes
⚑ (or pick:), and the selection bar can pick or unpick a whole
selection at once.
✕ Reject
Press X in the viewer and the photo becomes a rejection candidate. No file moves at that moment — the photo dims in the filmstrip below, and a “✕ 3” chip next to the caption counts them. Click the chip to look them over at any time, and press U if you change your mind.
When you close the viewer (Esc, a click outside the photo, or the ✕ at the top right) with candidates still marked, a confirmation screen opens. It shows every marked photo as a thumbnail: press “Keep” on the ones you want back, then “Move N to trash” to move the rest in one go. They go to the OS trash, so you can restore them later — restored files are picked up by the watcher and come back to the library (★ favorites and ⚑ picks have to be set again).
View the selection
“View the selection” in the bar opens the viewer on just those photos. ← → stay inside the selection, and the counter in the caption counts the photos you picked out. To choose one frame out of a burst, select the burst, come in here, and work through it with P and U.
Copy to folder / Move to folder
These put the selected files straight into the folder you pick, without date subfolders —
handy for handing a few photos to someone, or filling a USB stick. A file that is already
there — same name, size and timestamp — is left alone, so writing the same photos to the
same folder again adds nothing; a different file that happens to share a name gets
-1, -2 appended.
Moving takes those photos out of the library. They are gone from their old location, gone from the grid, and their ★ / ⚑ marks do not come with them. pictkura asks first. A photo that is already at the destination, or that fails to copy, stays where it was and in the library. Moving to another drive copies the file and then sends the original to the Recycle Bin — the app still never removes a file outright. A photo that was copied but whose original could not be sent to the Recycle Bin ends up in both places and stays in the library (“copied, but could not be removed from the original place”).
Files that only exist in the cloud are downloaded first, because writing them out has to read them — that applies to moving too, even within the same drive. See 8. Files that only exist in the cloud.
The selection follows what is on screen. Changing the search or the ★ / ⚑ filter, or switching to the calendar, clears it — so a bulk action never reaches photos you cannot see. Deleting still goes through the Recycle Bin.
7. Supported file formats
Photos
| Format | Grid | Viewer | Notes |
|---|---|---|---|
jpg jpeg | ✅ | ✅ | Decoded while downscaling, so even large photos are quick |
png webp | ✅ | ✅ | |
avif | ✅ | ✅ | Decoder is bundled; no OS extension needed |
heic heif hif | ✅ | ✅ | The iPhone default. Pixel decoding is left to the OS (see below) |
bmp gif tif tiff | ✅ | ✅ | TIFF is re-encoded to JPEG for display |
svg | ✅ | ✅ | Drawn from the original, so zooming never degrades it |
RAW
No demosaicing. pictkura pulls out the display JPEG the camera wrote for its own rear screen. That takes a few milliseconds per file, and the colors are the camera’s own rendering.
If you shoot RAW+JPEG, the grid stacks each pair into one tile.
A RAW and a non-RAW image in the same folder, with the same name apart from the extension and the same capture time to the second, form a pair.
A file whose capture time could not be read, and which is dated only by its modification time, is never paired.
For example, IMG_0001.CR3 and IMG_0001.JPG pair up (a HEIF .HIF pairs too; videos never do).
A pair shows as the non-RAW image (usually the JPEG), with a RAW+JPEG badge in the corner
(on narrow tiles, a mark of two overlapping squares).
In the grid, ★, ⚑, delete and selection apply to both. Full screen shows only the non-RAW file (usually the JPEG) by default,
and ★, ⚑, ✕ and delete there apply to both files too. You can switch to RAW only, or to both
(RAW first), under Settings → “When you view a photo full screen” or with the RAW / JPEG
buttons in full screen. With both, they apply only to the file you are looking at.
The count next to each date is a file count, so it runs higher than the tiles you see. Selection counts, and the counts in delete and move confirmations and results and in ★/⚑ results, are file counts too.
To see them separately, turn it off under Settings → Photo grid.
Photos taken in quick succession with the same camera (a burst) also stack into one tile.
The corner shows the number of shots, such as ▤ Burst 12 (shortened to ▤ 12 on narrow tiles).
Shots join a burst when they come from the same camera (its model, and its body serial number when
recorded), their capture time is recorded to a fraction of a second, and each is within the set gap
of the one before (1 second by default). Photos from cameras that record whole seconds only are not
stacked. For photos imported before 0.2.9, the fraction of a second is read again afterwards for
images such as JPEG and HEIC only, not for RAW or TIFF (those files are heavy), so an existing burst
shot in RAW only does not stack (shot as RAW+JPEG, it stacks through the JPEGs). The cover is a shot marked ⚑, or else the first shot.
In the grid, ★ and ⚑ from the right-click menu go on the cover only; delete and selection apply to
the whole burst. Inside a burst, a RAW and its JPEG count as one shot even with RAW+JPEG stacking off. Selection counts and the counts in delete and move confirmations and results are file counts, not shots. Turn bursts off, or change the gap (0.5, 1 or 2 seconds), under Settings → Photo grid.
Click the badge on a stacked tile (RAW+JPEG or ▤ Burst) to spread it out in place.
A burst spreads into its shots, and a RAW+JPEG pair into the RAW and the JPEG (a shot in a burst that is a pair stays one tile).
Spread tiles behave like any other photo: ★, ⚑, delete and selection apply to that tile only. Click “Fold” in the corner to stack them again.
Clicking anywhere else on the tile opens the photo as before.
| Extensions | Files | A picture | Full size | Small | None | |
|---|---|---|---|---|---|---|
| A full-size picture | cr3 rw2 nef arw raf orf ori pef srw rwl x3f nrw kdc cr2 | 1,435 | 1,432 | 1,399 | 33 | 3 |
| A picture, but small | 3fr iiq erf mos srf sr2 | 52 | 52 | 7 | 45 | — |
| Split three ways | dng | 257 | 166 | 75 | 91 | 91 |
| Most carry none | crw raw mrw dcr | 75 | 22 | 12 | 10 | 53 |
| Splits by body | fff | 11 | 7 | 1 | 6 | 4 |
| Built on a PC | arq | 1 | 1 | 1 | — | — |
| No file we could obtain | ptx | 0 | — | — | — | — |
Full size means the preview's longest edge reaches 1600px, where a full-screen view stops looking soft. None means only a frame appears; the file still sorts by date and still answers the camera filter, because the size and the EXIF are read separately from the picture.
Measured on 2026-09-04 against 1,870 real files (every CC0 sample at raw.pixls.us),
with no crashes. ori and arq joined the scan list in 0.2.7, after this sweep had run — their 20 files are counted in the table above. 923 bodies from 56 makers are listed here — look up your own, with the file we measured linked from each row.
Video
| Format | Grid | Plays in app | Notes |
|---|---|---|---|
mp4 m4v mov webm | ✅ | ✅ | Codecs depend on the OS (HEVC — see below) |
avi mts m2ts mkv 3gp wmv mpg mpeg | ✅ | ❌ | Use “Open in default app” to play |
Appearing in the grid is the same on every platform. What changes is whether a
picture comes with it: the ✅ in the grid column above is what was checked on Windows, and
even there the picture comes from the OS, not from pictkura. Grid thumbnails are borrowed from
the OS, so a container is
covered exactly as far as the OS can open it. On Windows that is the Shell, the same mechanism
Explorer uses: .avi and HEVC .mov were measured coming back with a
frame, .m2ts has never been checked, and anything the OS has no handler or codec
for comes back empty. That HEVC measurement was taken on a machine with the paid extension
described below installed; it was never tried without it.
AVFoundation on macOS answers only for what it can open — mp4
and mov were measured returning a real frame, with H.264 and with HEVC
(hvc1, the fourcc an iPhone writes), though those HEVC samples were re-encoded by
macOS itself rather than written by a phone. .avi was
measured returning nothing. Anything not named here is untested on both: a picture is
possible, but not guaranteed. Linux has no route at all.
Duration, dimensions and capture time come from the container header for mp4,
m4v, mov and 3gp — not a single byte of pixel data is
read. Note that webm is not among them, even though it sits in the first row
above. The other containers have nothing but the Windows Shell to fall back on — measured with
a synthetic .m2ts, which came back with both duration and dimensions; the rest
were never checked.
On macOS and Linux those containers show no duration or dimensions, and the
date falls back to the file name or the modification time.
Video volume and mute are remembered, so the next video starts the same way. While muted (volume 0 included), the viewer shows a speaker icon with a cross; click it to turn the sound on.
8. Files that only exist in the cloud
On Windows, “Pictures” points at OneDrive by default, and after a while much of what is in it becomes “online-only”: the real file lives in the cloud and all you have locally is a marker.
pictkura never downloads them on its own. Installing the app will not quietly pull gigabytes over your connection.
- They do appear in the grid. Dimensions and capture time come from what the OS already knows, so they sit on the correct date
- The image may not appear. The real file is fetched only when you actually go and look at it
- Copying or moving to a folder, copying to the clipboard and printing fetch the real file. Rotating is not available
- Video duration is missing. It cannot be known without reading the container, and that needs the real file
- Videos are stopped before they open. Opening a multi-gigabyte video would download the entire file, so pictkura explains the situation and steers you to “Open in default app”
9. Outgoing
Outgoing lines up, at every import, what you want to hand to a photo service in an Outgoing folder. Today it is for Google Photos. Folder backup in Google Photos uploads the folder you add as a whole, with no setting to leave out RAW files or videos, so pictkura places only what should go up in the Outgoing folder. pictkura does not talk to Google; the uploading is done by Google Photos.
How it works and how to start, with diagrams, are on the Outgoing page. This section gives the detailed rules.
Getting started
- In Settings → Outgoing, turn on “Also place imported photos in the Outgoing folder”. The folder is created and its place is shown
- If you use Google Photos: in Google Photos (photos.google.com), add that folder with “+” → folder backup
If you use Google Photos: uploading is done by the Google Photos web page (photos.google.com), not by pictkura. So it only goes ahead while that page is open in your browser. While the browser is closed, the photos wait in the folder.
What goes in
- Every import lines up the photos it copied (except those matching the library’s exclude patterns), in the same folder layout as inside the library location
- For RAW+JPEG pairs, only the JPEG. For RAW-only shots, Settings offers “Leave out” or “Place the embedded JPEG” (the preview picture the camera stored inside the RAW, given the capture date). A RAW without a preview of at least 1000 px on the long edge (some older cameras, and some phones’ DNG files) is not placed
- Videos follow “Place videos too”. Photos inside OneDrive go in only when that setting is on
- With “Stack bursts into one tile” on, a burst within one import is placed as its first frame only. A frame you flag ⚑ later is added only when a frame of the same burst is already in Outgoing (not when you flag the whole burst at once; removing ⚑ does not take it out of Outgoing)
- When a real JPEG with the same name is imported later for a RAW-only shot, it replaces the JPEG taken out of the RAW
- Photos are placed as hard links (a second name for the same file), so they take no extra disk space. An embedded JPEG is a separate file and does take space
Sending photos you imported earlier
These appear only while Outgoing is turned on in Settings.
- Select them in the grid and use “Add to Outgoing” on the selection bar. “Add to Outgoing” in a photo’s right-click menu sends only that photo. With bursts stacked, the selection bar and the calendar place every frame of a burst, and the right-click menu places only its cover frame
- Right-click a month heading in the calendar for “Add this month to Outgoing” or “Add all of <year> to Outgoing”. It covers the photos the current search and filter show
- Over 100 photos, after select-all or a range, from the calendar, and when a new folder has to be made, pictkura shows what will be placed before placing anything
- What you choose goes in even if it is a video or a RAW-only shot (as its embedded JPEG, when one of at least 1000 px on the long edge can be taken out); those two settings only steer what an import places on its own. Photos inside OneDrive follow their setting
- Files that exist only in the cloud are not placed. Download them first, then send again
Seeing and removing what was placed
“Outgoing” on the left appears while Outgoing is turned on in Settings, and while anything placed is still there.
- Click it to list only what is in the Outgoing folder, with a count. While Outgoing is on, a note above the list says which folder to choose in your photo service, with “Open folder” and “Copy path”
- Select photos there and use “Remove from Outgoing” on the selection bar. “Remove from Outgoing” in a photo’s right-click menu removes only that photo. pictkura does not ask first; it tells you how many were removed
- Only what is in the Outgoing folder is removed. The originals on your computer stay. If you use Google Photos: it stays in Google Photos
- Anything that could not be removed right now (the drive may be disconnected) also leaves the list, and pictkura tries again the next time it starts
One Outgoing folder per drive
Hard links cannot cross drives, so each drive that holds photos gets its own Outgoing folder
(pictkura-outgoing under your home folder if the drive holds it, otherwise at the top of the drive).
When one is created, the confirmation or the import result usually tells you (not when it is made by the retry at startup). The current Outgoing folder is shown under “Folder” in Settings → Outgoing; when photos have been placed in other Outgoing folders too, every folder used so far is listed below it. Each one has “Open folder” and “Copy path”.
If you use Google Photos: add each one you use in Google Photos.
You can choose another place on the same drive as the import destination with Settings → Outgoing → Change. This changes only where new photos are placed: what is already in the previous Outgoing folder stays there (and stays in the list in Settings). Keep the previous folder added to your photo service until everything in it has been uploaded.
It cannot be placed:
- on an exFAT or FAT drive (they cannot make hard links; many external USB drives use them)
- for a library location that is a whole drive, such as an SD card
- while the import destination is a whole drive (change the import destination)
- while your home folder itself, or a folder containing it, is a library location (the default place falls inside the library; if the import destination is on the same drive, choose a place in Settings; otherwise photos on that drive cannot be sent)
- inside a sync folder (OneDrive, Google Drive, Dropbox, iCloud Drive, and Desktop and Documents on a Mac). pictkura only recognises their default places; avoid a sync folder you put somewhere else yourself
- while no import destination is set or it cannot be reached (Outgoing cannot be turned on)
- when the Outgoing folder is a symbolic link or junction
Keep it outside any folder another backup watches, such as a NAS or Amazon Photos. Inside one, the same photo is backed up twice.
When something is deleted
- Moving a photo to the Recycle Bin in pictkura also takes it out of the Outgoing folder. If you use Google Photos: it stays in Google Photos
- If an original is deleted outside pictkura, what is left in the Outgoing folder goes to the Recycle Bin. While the original is still in the Recycle Bin it stays; after the Recycle Bin is emptied, it moves the next time pictkura scans (at startup, an import, a rescan, or when it notices a folder change)
- An embedded JPEG goes to the Recycle Bin at the next scan after its RAW is moved to the Recycle Bin, renamed or moved elsewhere outside pictkura (it is not the same file as the RAW, so these cannot be told apart)
- Photos moved with pictkura’s “Move to folder” are no longer followed: what was placed stays, and trashing them later does not take it out of the Outgoing folder
- Photos renamed or moved within the same drive outside pictkura keep what was placed. If such a photo is deleted later, what was placed goes to the Recycle Bin the next time pictkura scans after the Recycle Bin is emptied. Moving one to another drive counts as deleting it
- Deleting things inside the Outgoing folder yourself does not touch the originals
Google Photos is a trademark of Google LLC.
10. Update notices
A few seconds after it starts, pictkura asks once whether a newer version exists. If there is one, a quiet line naming the new version appears at the bottom of the window; pressing it opens the download page in your default browser. The app never replaces itself.
This is the only outbound connection the app makes. All it sends is “pictkura version X is asking”; it sends no photos, no file names, and no folder paths. All it receives is the name of the latest version. It asks at most once a day, and if it cannot reach the network it fails silently, without showing an error.
If you would rather it did not, turn off Settings → About → “Check for updates at startup”. With that off, pictkura never reaches the network at all — and you can still press “Check for updates” in the same place to ask once, right then.
The Microsoft Store version is updated by the Store. pictkura itself does not check for new versions there, so this notice and its settings do not appear.
11. Limitations and things it does not do
| Subject | Detail |
|---|---|
| HEIC / HEVC need OS components on Windows | The HEVC decoder is not bundled — patent licensing makes that impractical, so pictkura uses the one the OS has. On Windows that means installing “HEIF Image Extensions” (free) plus “HEVC Video Extensions” (paid, about a dollar) to decode the pixels; the app tells you when one is missing. On macOS there is nothing to install — ImageIO and the HEVC decoder ship with the system |
| Video thumbnails go only as far as the OS can open the container | On Windows the Shell provides them — .avi and HEVC .mov measured working, .m2ts never checked, anything the OS has no handler or codec for comes back empty. macOS shows what AVFoundation can open — mp4 and mov measured working with H.264 and HEVC (hvc1) samples, .avi measured empty, every other container untested. Linux has no route at all |
Duration and dimensions outside mp4, m4v, mov, 3gp | Those four are read straight from the container header. The rest rely on the Windows Shell (measured with a synthetic .m2ts only); on macOS and Linux they show no duration or dimensions (the date falls back to the file name or modification time) |
.m2ts / .avi do not play in the app | The browser engine cannot handle those containers. They still appear in the grid |
| A RAW that declares its size nowhere shows none | Dimensions come from the file’s own declaration, from the sensor borders inside Panasonic’s own RAW formats (rw2, raw, rwl — the Leicas built on those bodies included), or from the embedded preview. A RAW with none of those (measured: the Blackmagic CinemaDNG) shows no size in the grid, and is asked again on every startup. On Windows a file that only exists in the cloud is the exception — the Shell supplies its dimensions without downloading it |
| No UI to rebuild the search index | If it breaks, delete pictkura.db in the settings folder and let it rebuild (thumbnails are rebuilt too, and ★, ⚑, the records that let a rotation be undone and the record of what was placed in Outgoing or is waiting to be placed again are lost) |
| No sort options for results | Newest capture date first, always |
| An import cannot be canceled | Once started, it runs to the end |
| RTL layouts | Right-to-left languages such as Arabic are not supported yet |
12. Where settings and data live
| File | Location (Windows) |
|---|---|
| Settings | %APPDATA%\dev.harusame.pictkura\pictkura.toml |
| Database | %APPDATA%\dev.harusame.pictkura\pictkura.db |
| Thumbnails | %APPDATA%\dev.harusame.pictkura\thumbs\ |
| Log | %APPDATA%\dev.harusame.pictkura\pictkura.log (created only for the things listed below) |
The Microsoft Store version uses the same places if another build of pictkura was used with this Windows account (settings and the index carry on as they are).
If only the Store version is used, they live in %LOCALAPPDATA%\Packages\<package name>\LocalCache\Roaming\dev.harusame.pictkura\, and uninstalling the Store version deletes that folder.
About the log.
It records the things that did not work — a read that fell over
part-way (a corrupt file, say), a sidecar that could not be moved to the recycle bin, a
launch that failed — and what it did in the Outgoing folders (creating one, removing from it,
placing what could not be placed earlier), and what it put right on its own (a file left half-rotated, AutoPlay entries an older version registered, a window that ended up off screen or did not fit the display), one line each. Other successes are not written. The failures written are
the machine falling over: an index it cannot read or write, a setting it
cannot save. That includes ones you were told about on screen, so you can
report them afterwards. What does not get written is a choice you can simply make
again — a folder that is not there, a library another app manages — or something
the screen already shows you, like a thumbnail that does not appear. So no
file means none of the failures that belong here have happened (if you use Outgoing, or pictkura put something right on its own, the file
can exist without any failure).
Open it from Settings → “About” → “Open the log” (the button is disabled while there
is nothing to open). The sentences this app writes there are English whatever language the app is
set to, so they can go straight into a bug report; what you see on screen stays in your own
language. Reasons handed back by Windows or macOS stay in that system's language,
because they are not ours to translate. It stays on this machine and is
never sent anywhere. Lines can contain file names and folder paths, so read it
before pasting it into a bug report. Deleting it is fine; it is created again if it is needed.
It has a size cap, and when it is passed the previous record is kept as
pictkura.log.1 — unless it cannot be moved aside (another program holding the
file open, say), in which case the older half is dropped to keep the cap, and the log says so.
You can edit the settings file by hand. Anything the app has no UI for — the patterns of
folders to exclude from scanning, or [import] sidecar_extensions for the files
carried along with each photo — can be changed there.
Setting Outgoing’s [google_mirror] exclude_raw = false places every RAW as it is
(paired RAWs and RAW-only shots alike; the “RAW-only shots” setting then has no effect).
Your photos are never stored in these places.
Deleting the database does not delete any photo; it is rebuilt, though ★, ⚑, the records that let a rotation be undone and the record of what was placed in Outgoing or is waiting to be placed again are lost.